KendoUI Grid popup editing and inline editing mixed together


If this is not the first time that you read my posts, you probably know that I actively participate in StackOverflow and you probably have already gone through some post where I write about some question that I think that deserves a little more information.

Few days back someone asked how (if possible at all) to get both popup and inline editing in the same grid. Basically what he was trying to do is using popup when creating a new record and use inline (or incell) for existing records. We might argue if from a standard UX point of view if this is good but I can see some cases where this might make sense so I’ve decided to investigate a little on it and I’ve tried to answer the question.

Mixing popup and inline editing in a grid

Research

The very first thing that I thought about was trying to invoke directly the functions that creates the popup window form for editing a record and the function that switches into inline (or incell) mode. The idea was if I can invoke the internal methods directly, I would be able to trigger the mode that I want defining custom buttons.

But when examining KendoUI code (yes, it’s is not Open Source but as Telerik Most Valuable Professional I have access to it) I see that I need to send extra arguments to the methods for popup and incell and it was not easy (clean) for me getting these arguments.

Second approach was invoking KendoUI Grid addRow method that enters in edit mode and depending on the initialization value, it is going to be “popup” or “inline”. The question was … if I change the edition mode dynamically and not at initialization time, will it be used?

The answer is yes, you can change the option dynamically and next time edit event is triggered the edition mode will change. This is not the case with some options for this and other Kendo UI Widget that once the widget is created, they will not read back the options.

How to implement it

What I had to do is:

  1. Initialize the Grid for using, by default, inline mode.
  2. Define a Custom button in the toolbar that looks like the standard “Add new row” but executes our own code.
  3. Define the button handler that forces the edition mode to “popup”, invokes editRow and restores previous edition mode (“inline”)

This would be something like

var grid = $("#grid").kendoGrid({
    dataSource: ds,
    toolbar: [ 
        {
            // My own version of "Add new record" button, with name **popup**
            text : "Add new record", 
            name: "popup", 
            iconClass: "k-icon k-add"
        }
    ],
    // By default is **inline**
    editable: "inline",
    ...
}).data("kendoGrid");

Here we can see that I’ve created in the toolbar a button with name “popup” and showing the text “Add new record”, the same being displayed by the default “create” button. Finally, I’ve define the icon that should be displayed in the button having the button look exactly the same than the standard “create” button.

The second important question is that I’ve defined “editable” as “inline” so it is expected that I define an “edit” button for each row and when clicked, it enters in “inline” edition.

Now, the missing part: attach a click event handler attached to my “popup” button. This is:

// Event handler for my **popup** button defined in the grid toolbar
$(".k-grid-popup", grid.element).on("click", function () {
    // Temporarily set editable to "popup"
    grid.options.editable = "popup";
    // Insert row
    grid.addRow();
    // Revert editable to inline
    grid.options.editable = "inline";
});

Binding a function to the click event for buttons defined in the toolbar is defining using “on” jQuery method for the CSS class “.k-grid-” in our case since “name” is equal to toolbar, we use the CSS “.k-grid-popup”.

As you can see is a pretty simple process, pretty clean and you don’t have to do a lot of code edition or source code change.

You can play with it in this JSFiddle.
KendoUI DataSources + Dropbox DataStore: Create


After checking how to read data from Dropbox DataStore, update, and delete. It is time for creating new records.

Creating records into Dropbox DataStore from KendoUI Grid

Now, the important question to remember is that when KendoUI creates a record in a Grid, the value assigned to id is default value defined in the model, which typically is not defined and as consequence stays to null.

But, when the record is created in the server, it has to return an id not null to be used.

Grid modification for creating

What I am going to do is adding a button to the toolbar for creating a new record. Something like:

$("#grid").kendoGrid({
    dataSource: taskTableDS,
    editable  : "popup",
    toolbar   : ["create"],
    columns   : [
        { command: ["edit", "destroy"], width: 180 },
        { field: "taskname", width: 80 },
        { field: "created", format: "{0:G}", width: 200 },
        { field: "completed", width: 70 }
    ]
});

First step easy!

Add create method to transport

Now, the second step is adding the transport.create method that saves the data into Dropbox (using insert method) and informs KendoUI about the id of the newly created record.

create : function (op) {
    // Remove id to do not have it duplicated
    delete op.data.id;
    var record = taskTable.insert(op.data);
    op.success([record]);
}

It is important to note that KendoUI success will actually call schema.model.parse for converting record from Dropbox format into KendoUI format.

parse: function (d) {
        var res = [];
        $.each(d, function (idx, elem) {
            res.push(parseItem(elem));
        });
        return (res);
}

Now, the complete code of the example is:

// Insert your Dropbox app key here:
var DROPBOX_APP_KEY = '0sh............';

// Exposed for easy access in the browser console.
var client = new Dropbox.Client({key: DROPBOX_APP_KEY});
var taskTable = null;

// Try to finish OAuth authorization.
client.authenticate({interactive: true}, function (error) {
    if (error) {
        alert('Authentication error: ' + error);
    }
});

function parseItem(elem) {
    return {
        id       : elem.getId(),
        taskname : elem.get("taskname"),
        created  : elem.get("created"),
        completed: elem.get("completed")
    };
}

function readTasks(op) {
    if (client.isAuthenticated()) {
        // Client is authenticated. Display UI.
        var datastoreManager = client.getDatastoreManager();
        datastoreManager.openDefaultDatastore(function (error, datastore) {
            if (error) {
                alert('Error opening default datastore: ' + error);
            }
            taskTable = datastore.getTable('tasks');
            var records = taskTable.query();
            op.success(records);
        });
    }
}

var taskTableDS = new kendo.data.DataSource({
    transport: {
        read   : function (op) {
            readTasks(op);
        },
        update : function (op) {
            var data = op.data;
            var id = data.id;
            // Remove id to do not have it duplicated
            delete op.data.id;
            var record = taskTable.get(id).update(data);
            op.success([record]);
        },
        destroy: function (op) {
            taskTable.get(op.data.id).deleteRecord();
            op.success();
        },
        create : function (op) {
            // Remove id to do not have it duplicated
            delete op.data.id;
            var record = taskTable.insert(op.data);
            op.success([record]);
        }
    },
    schema   : {
        model: {
            id    : "id",
            fields: {
                id       : { type: "string" },
                taskname : { type: "string" },
                created  : { type: "date", editable: false },
                completed: { type: "boolean" }
            }
        },
        parse: function (d) {
            var res = [];
            $.each(d, function (idx, elem) {
                res.push(parseItem(elem));
            });
            return (res);
        }
    }
});

$("#grid").kendoGrid({
    dataSource: taskTableDS,
    editable  : "popup",
    toolbar   : ["create"],
    columns   : [
        { command: ["edit", "destroy"], width: 180 },
        { field: "taskname", width: 80 },
        { field: "created", format: "{0:G}", width: 200 },
        { field: "completed", width: 70 }
    ]
});

And the example looks like:

KendoUI DataSources + Dropbox DataStore: Delete


After seeing first how to read data from Dropbox DataStore into Kendo UI DataSource and then how to update it, now it is time for deleting records.

Deleting records from Dropbox DataStore

Start adding a delete button to the Grid.

$("#grid").kendoGrid({
    dataSource: taskTableDS,
    editable  : "inline",
    columns   : [
        { command: ["edit", "destroy"], width: 180 },
        { field: "taskname", width: 80 },
        { field: "created", format: "{0:G}", width: 200 },
        { field: "completed", width: 70 }
    ]
});

Deleting a record from DropBox is actually pretty simple, just invoke deleteRecord and it is gone! Then invoke success in Kendo UI side and also gone from Kendo UI DataSource.

So, my DataSource transport.destroy method is:

destroy: function (op) {
    taskTable.get(op.data.id).deleteRecord();
    op.success();
}

And the complete code is:

// Insert your Dropbox app key here:
var DROPBOX_APP_KEY = '0sh............';

// Exposed for easy access in the browser console.
var client = new Dropbox.Client({key: DROPBOX_APP_KEY});
var taskTable = null;

// Try to finish OAuth authorization.
client.authenticate({interactive: true}, function (error) {
    if (error) {
        alert('Authentication error: ' + error);
    }
});

function parseItem(elem) {
    return {
        id       : elem.getId(),
        taskname : elem.get("taskname"),
        created  : elem.get("created"),
        completed: elem.get("completed")
    };
}

function readTasks(op) {
    if (client.isAuthenticated()) {
        // Client is authenticated. Display UI.
        var datastoreManager = client.getDatastoreManager();
        datastoreManager.openDefaultDatastore(function (error, datastore) {
            if (error) {
                alert('Error opening default datastore: ' + error);
            }
            taskTable = datastore.getTable('tasks');
            var records = taskTable.query();
            op.success(records);
        });
    }
}

var taskTableDS = new kendo.data.DataSource({
    transport: {
        read   : function (op) {
            readTasks(op);
        },
        update : function (op) {
            var data = op.data;
            var id = data.id;
            // Remove id to do not have it duplicated
            delete op.data.id;
            var record = taskTable.get(id).update(data);
            op.success([record]);
        },
        destroy: function (op) {
            taskTable.get(op.data.id).deleteRecord();
            op.success();
        }
    },
    schema   : {
        model: {
            id    : "id",
            fields: {
                id       : { type: "string" },
                taskname : { type: "string" },
                created  : { type: "date", editable: false },
                completed: { type: "boolean" }
            }
        },
        parse: function (d) {
            var res = [];
            $.each(d, function (idx, elem) {
                res.push(parseItem(elem));
            });
            return (res);
        }
    }
});

$("#grid").kendoGrid({
    dataSource: taskTableDS,
    editable  : "popup",
    columns   : [
        { command: ["edit", "destroy"], width: 180 },
        { field: "taskname", width: 80 },
        { field: "created", format: "{0:G}", width: 200 },
        { field: "completed", width: 70 }
    ]
})

What I get is:

KendoUI DataSources + Dropbox DataStore: Update


In my previous post I showed you how to read data from Dropbox DataStore. Now, it is time for updating it.

Kendo UI DataSource and Dropbox DataStore: Updating

Reading data was pretty simple, we used openDefaultDatastore for getting access to the DataStore, then getTable for accessing the table and finally query for retrieving the selected data.

When we get to update there are two main modes that we might choose:

  1. Save each field of a record independently using set: which might be fine for attributes on a structure.
  2. Use update for updating a record in a single transaction.

For my grid, I opted for the second, despite some fields might not have changed I do prefer to transfer all and reduce number of transaction with Dropbox server. Actually, there is a second reason that is that KendoUI keeps track of dirty records but not dirty fields.

DataSource grid editable

Now, my Grid definition is:

$("#grid").kendoGrid({
    dataSource: taskTableDS,
    editable  : "popup",
    columns   : [
        { command: ["edit" ], width: 90 },
        { field: "taskname", width: 80 },
        { field: "created", format: "{0:G}", width: 200 },
        { field: "completed", width: 70 }
    ]
})

The difference is that I’ve added a button edit for opening a popup window where I can edit the record.

Now, I should work in the KendoUI DataSource transport.update method.

DataSource transport update

Updating a record in Dropbox server is basically transforming the data from KendoUI DataSource format into Dropbox DataStore keeping in mind a couple of questions.

  1. If the JSON field containing the new record data contains an attribute called id, then Dropbox will save it as attribute but this is not going to be the same than the id that Dropbox uses for the record. So for having it nicer, I’m going to delete the id from the JSON before sending it to Dropbox server.
  2. The result of updating the record is expected to be sent to KendoUI invoking success or error on the object received as argument of KendoUI transport.update
update : function (op) {
    var data = op.data;
    var id = data.id;
    // Remove id to do not have it duplicated
    delete op.data.id;
    var record = taskTable.get(id).update(data);
    op.success([record]);
},

Now, I can update my grid records and I will see them immediately updated in Dropbox example of task list.

As you can see, since Dropbox example adds listener for detecting changes done by other devices or application, what I modify in KendoUI grid is immediately visible in their example but not viceversa (stay tuned since I will get there).

KendoUI Grid: custom sorting algorithms


There was a couple of times that I have had to sort columns in a KendoUI Grid but using my custom order. I mean, not using out-of-the-box ordering but doing something especial. Example: order ignoring accents, upper-lower case… but I couldn’t find how to do easily do it and end-up implementing server side filtering and sending the data sorted from the server. For what I was looking for, that was acceptable but this is not always desirable.

This week Atanas Korchev (@korchev) from Telerik, show us how to do it in Stack Overflow: easy and neat! Let me show you how.

KendoUI Grid: defining sortable columns

This is pretty easy, just define sortable: true in your Grid and it will work.

$("#grid").kendoGrid({
    dataSource: {
        data    : [
            { id: 1, name: "one" },
            { id: 2, name: "two" },
            { id: 3, name: "three" },
            { id: 4, name: "four" },
            { id: 5, name: "five" }
        ],
        pageSize: 10,
        schema  : {
            model: {
                fields: {
                    id  : { type: 'number' },
                    name: { type: 'string' }
                }
            }
        }
    },
    editable  : false,
    pageable  : false,
    sortable  : true,
    columns   : [
        { field: "id", title: "Number" },
        { field: "name", title: "Name" }
    ]
});

And you get:

Sortable Grid
Sortable Grid

and if you click on the column header it will sort the column numerically or alphabetically.

KendoUI Grid: Defining custom order

But, what about if you want to order the column by Name but you want that it should be considered as numbers…

If we look at KendoUI documentation about sortable we can define it at Grid level:

Sortable Grid option

and at column level:

KendoUI Grid column sortable option

But despite the first says Can be set to a JavaScript object which represents the sorting configuration it does not provide any detail.

At least now, we have some details. Here is how to define a custom compare function.

KendoUI Grid: Custom compare function

Despite the documentation says that columns.sortable needs to be a Boolean it actually can be an object and one of the members of this object is a compare function that return -1 if first argument is less than seconde, 0 if both are the same or +1 if the second is greater that then first.

{
    field   : "name",
    width   : 200,
    title   : "Name",
    sortable: {
        compare: function (a, b) {
            return numbers[a.name] - numbers[b.name];
        }
    }
}

Now, for the sake of this example, what I do is defining an associative array for translating number names into numbers (this is only an example!).

var numbers = {
    "one"  : 1,
    "two"  : 2,
    "three": 3,
    "four" : 4,
    "five" : 5
};

Now, my grid definition is:

var grid = $("#grid").kendoGrid({
    dataSource: {
        data    : [
            { id: 1, name: "one" },
            { id: 2, name: "two" },
            { id: 3, name: "three" },
            { id: 4, name: "four" },
            { id: 5, name: "five" }
        ],
        pageSize: 10,
        schema  : {
            model: {
                fields: {
                    id  : { type: 'number' },
                    name: { type: 'string' }
                }
            }
        }
    },
    editable  : false,
    pageable  : false,
    sortable  : true,
    columns   : [
        { field: "id", title: "Number" },
        {
            field   : "name",
            title   : "Name",
            sortable: {
                compare: function (a, b) {
                    return numbers[a.name] - numbers[b.name];
                }
            }
        }
    ]
}).data("kendoGrid");

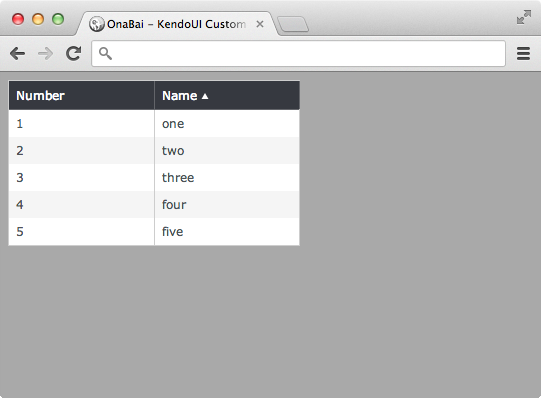
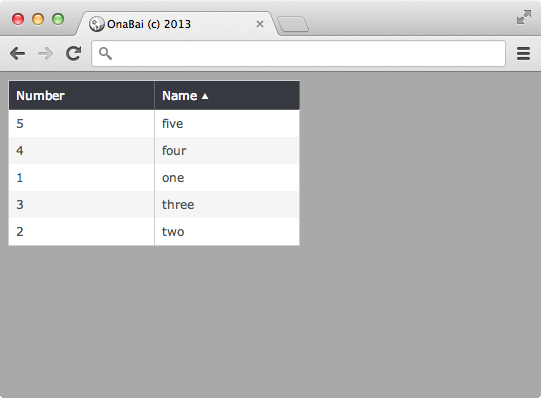
And when sorting what I get is:

KendoUI Grid custom sorted

KendoUI Grid: custom sorting strings

Have you ever tried sorting a column with string with mixed upper-lower case, accents…? Seems that KendoUI engineers have considered that we want alphabetical order (which is very useful) and not ASCII order.

Let’s consider that we have the following data in our DataSource

[
    { id: 1, name: "Johan" },
    { id: 2, name: "john" },
    { id: 3, name: "Jöhän" },
    { id: 4, name: "john" },
    { id: 5, name: "John" },
    { id: 6, name: "john" }
]

Where we see John in uppercase (record with id 5) and in lowercase (record with id 2, 4 and 6) or Johan with different punctuations.

If we define a Grid with this data and sort it by column name

var grid = $("#grid").kendoGrid({
    dataSource: {
        data    : [
            { id: 1, name: "Johan" },
            { id: 2, name: "john" },
            { id: 3, name: "Jöhään" },
            { id: 4, name: "john" },
            { id: 5, name: "John" },
            { id: 6, name: "john" }
        ],
        pageSize: 10,
        schema  : {
            model: {
                fields: {
                    id  : { type: 'number' },
                    name: { type: 'string' }
                }
            }
        }
    },
    editable  : false,
    pageable  : false,
    sortable  : true,
    columns   : [
        { field: "id", title: "Number" },
        { field: "name", title: "Name" }
    ]
}).data("kendoGrid");

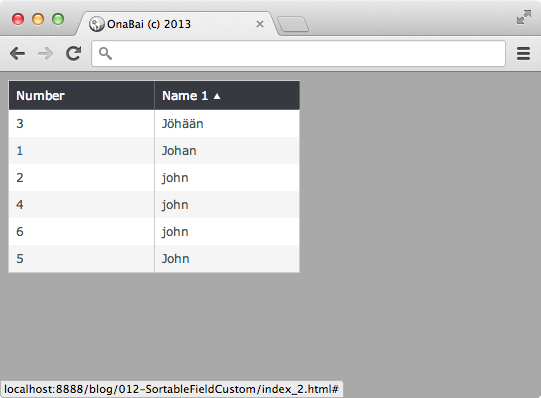
What I get is:

Sorting name with default compare function

That show that “Jöhään” is lower than “Johan” and “john” is always lower than “John” (odd?!)

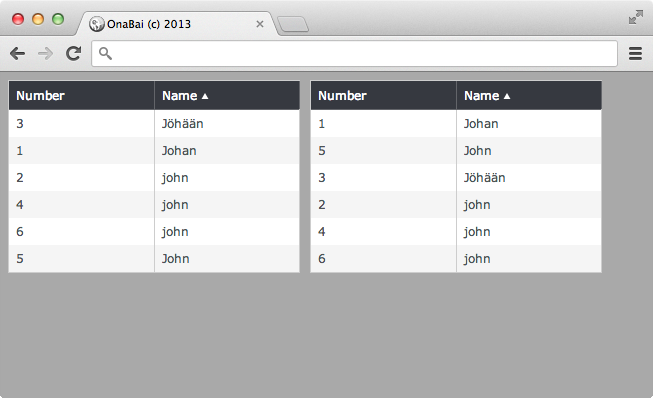
Let’s define a sorting function using standard order. What I will do show side by side two grids with the same data.

My Grid definition is:

var grid1 = $("#grid1").kendoGrid({
    dataSource: {
        data    : [
            { id: 1, name: "Johan" },
            { id: 2, name: "john" },
            { id: 3, name: "Jöhään" },
            { id: 4, name: "john" },
            { id: 5, name: "John" },
            { id: 6, name: "john" }
        ],
        pageSize: 10,
        schema  : {
            model: {
                fields: {
                    id  : { type: 'number' },
                    name: { type: 'string' }
                }
            }
        }
    },
    editable  : false,
    pageable  : false,
    sortable  : true,
    columns   : [
        { field: "id", title: "Number" },
        { field: "name", title: "Name" }
    ]
}).data("kendoGrid");
var grid2 = $("#grid2").kendoGrid({
    dataSource: {
        data    : [
            { id: 1, name: "Johan" },
            { id: 2, name: "john" },
            { id: 3, name: "Jöhään" },
            { id: 4, name: "john" },
            { id: 5, name: "John" },
            { id: 6, name: "john" }
        ],
        pageSize: 10,
        schema  : {
            model: {
                fields: {
                    id  : { type: 'number' },
                    name: { type: 'string' }
                }
            }
        }
    },
    editable  : false,
    pageable  : false,
    sortable  : true,
    columns   : [
        { field: "id", title: "Number" },
        {
            field   : "name",
            title   : "Name",
            sortable: {
                compare: function (a, b) {
                    return a.name === b.name ? 0 : (a.name > b.name) ? 1 : -1;
                }
            }
        }
    ]
}).data("kendoGrid");

You can se that for the first Grid I do not define any “special” sortable option while for second, I defined a compare function that returns 0, 1 or -1.

compare: function (a, b) {
    return a.name2 === b.name2 ? 0 : (a.name2 > b.name2) ? 1 : -1;
}

Now, if I order incrementally by name both Grids, I get:

String column with custom compare function.

Where now uppercase come before lowercase and non accented character also before than same with accent or punctuation.

Zafu: KendoUI JSP taglib + Couchbase (2)


Just a few hours after being presented KendoUI Q3 I wrote the first post on KendoUI JSP wrapper. It was a pretty simple grid that retrieved data from Couchbase 2.0. That first post showed how to get data from a Couchbase 2.0 view and displayed it in a grid doing the paging in the client. In that example that meant transfer almost 6000 records and then do the paging in the browser -not very smart for such volume-. This time, I will implement the paging in the server and transfer only a small group of records.

Zafu server-side paging

Step one, a brief introduction to what we need for implementing server-side paging and what KendoUI and Couchbase.

KendoUI server-side paging

Configuring a KendoUI grid for server-side paging is as easy as defining serverPaging as true in the DataSource definition used by our Grid (see documentation here or here). Something like:

<kendo:dataSource pageSize="10" serverPaging="true">
    <kendo:dataSource-transport>
        <kendo:dataSource-transport-read url="/ListBeer" type="GET"/>
    </kendo:dataSource-transport>
    <kendo:dataSource-schema data="data" total="total" groups="data">
        <kendo:dataSource-schema-model>
            <kendo:dataSource-schema-model-fields>
                <kendo:dataSource-schema-model-field name="name" type="string"/>
                <kendo:dataSource-schema-model-field name="abv" type="number"/>
                <kendo:dataSource-schema-model-field name="style" type="string"/>
                <kendo:dataSource-schema-model-field name="category" type="string"/>
            </kendo:dataSource-schema-model-fields>
        </kendo:dataSource-schema-model>
    </kendo:dataSource-schema>
</kendo:dataSource>

In the previous definition I specify both that the server will do paging (send a page at a time) and the size of each page defined in pageSize (defined as 10 in the previous example).

But, in addition when the DataSource loads data, it also needs to specify the number of records to skip from the dataset. What I will get in my servlet /ListBeer is four tuples of paramater-value:

  1. take the number of records to retrieve.
  2. skip the number of records to skip from the beginning of the DataSet.
  3. page the index of the current page.
  4. pageSize the number of records displayed on each page.

Couchbase 2.0 server-side paging

When we build a query in Couchbase 2.0, we define a series of parameter to configure it. This includes:

  1. setSkip for defining the number of elements to skip.
  2. setLimit for defining the number of records to retrieve.

The mapping between KendoUI and Couchbase 2.0 paging parameters is easy: KendoUI:skip maps into Couchbase:skip and KendoUI:take maps into Couchbase:limit.

New Java read code

The new read function (defined in the previous post) now is as follow:

public List read(String key, int skip, int limit) throws Exception {
    View view = client.getView(ViewDocument, ViewName);

    if (view == null) {
        throw new Exception("View is null");
    }

    Query query = new Query();
    if (key != null) {
        query.setKey(key);
    }
    if (skip >= 0) {
        query.setSkip(skip);
    }
    if (limit >= 0) {
        query.setLimit(limit);
    }
    query.setStale(Stale.FALSE);
    query.setIncludeDocs(true);
    query.setDescending(false);
    query.setReduce(false);

    ViewResponse result = client.query(view, query);
    Iterator<ViewRow> itr = result.iterator();
    return IteratorUtils.toList(itr);
}

Where skip is what I get in the servlet as request.getParameter(“skip”) and limit is request.getParameter(“take”).

First “problem” in KendoUI wrapper

NOTE: Please, remember that KendoUI JSP wrapper is a beta release which means (according the Wikipedia):

Beta (named after the second letter of the Greek alphabet) is the software development phase following alpha. It generally begins when the software is feature complete. Software in the beta phase will generally have many more bugs in it than completed software, as well as speed/performance issues. The focus of beta testing is reducing impacts to users, often incorporating usability testing. The process of delivering a beta version to the users is called beta release and this is typically the first time that the software is available outside of the organization that developed it.

So, having defects is not bad, it is something that we cannot avoid, and as far as it is usable (and so far it is) and the defects get fixed by the time the final release is introduced it is completely understandable.

The defect is the way we receive the parameters that is different that for traditional HTML / JavaScript usage but also a little odd.

Parameters in KendoUI HTML / Javascript

Parameters are sent to the server (unless you define your own parameter mapping) encoded in the URL as url?param1=value1&param2=value2&… (Ex: /ListBeer?pageSize=10&take=10&skip=0&page=1).

Parameters in KendoUI JSP wrapper

Parameters are sent to the server (unless you define your own parameter mapping) as a stringified JSON and this as a parameter: url?{param1:value1,param2:value2,…} (Ex: /ListBeer?{pageSize:10,take:10,skip:0,page:1}=).

And here I have two concerns:

  1. I should not change my servlet no mather I user HTML/JavaScript, ASP wrapper, JSP wrapper,…
  2. Sending a string serialized JSON object as a parameter name is not nice, if I want to send it as JSON I will send it in the value side of a parameter and not the name side.

Workaround

Have 2 different servlets (code paths) for parsing parameters:

  1. HTML/JavaScript
  2. JSP wrapper.

Fixes

  1. KendoUI fixes TransportTag.doEndTag to do not define as default parameterMap function a JSON.stringify but leave it empty (this is something that we **cannot do**).
  2. Define our own parameter map that sends the parameters encoded in the URL as HTML 5 / JavaScript does or as JSON but in the value side and with well-known parameter name.

Which one I do recommend…? Fix 1, and while KendoUI provide us a patched version, you fix it or you go with Fix 2.

<script type="text/javascript">
    function encodeParametersAsJSON(param) {
        return "param=" + JSON.stringify(param);
    }
</script>
...
<kendo:dataSource-transport parameterMap="encodeParametersAsJSON">
    <kendo:dataSource-transport-read url="/ListBeer" type="GET"/>
</kendo:dataSource-transport>

I do not recommend Workaround since you have to duplicate your java code.

Zafu: KendoUI JSP taglib + Couchbase (1)


A couple a days ago I attended KendoUI Q3 announcement. Being more in the Java than C# side I was very excited about JSP taglib (again, zillions of thanks).

Just one hour after finishing the presentation I connected to Couchbase 2.0 webinar on Couchbase App Development.

Few hours latter (about 4 working hours) I finished writing some code using both together.

Why took me almost 4 hours?

  1. Just as a little of feedback I admit that before this I didn’t write a single line of code for Couchbase (many for CouchDB using Java Client libraries as well as CouchApp) but they are not the same and they do not use the same Java Client library.
  2. I have written many lines of code for KendoUI using HTML5 + JavaScript (never ASP and C#), created new KendoUI widgets (and even fixed some bugs in KendoUI). BUT KendoUI JSP taglib is new, so I did not have experience on KendoUI JSP taglib neither on the server side, so a little of challenge.
  3. But this was not where I spend most of the time 😦 It was because Couchbase Java Client (plus the libraries that come with it), is for Java 6 while KendoUI JSP taglib is for Java 7 so I had to figure out how to run both together under Apache Tomcat (and this took me more than 2 hours).

@toddanglin,@BrandonSatrom,@JohnBristowe,@burkeholland,@alex_gyoshev Would be possible to have your taglib **officially** release for Java 6 too? You just need to change a couple of lines of code 😉

What I did in the remaining two hours was…

When you install Couchbase 2.0, you are prompted (at least I was) about installing a sample database (a list of almos 6000 beers!!!).

So, I’ve decide to display in a grid those (almost) 6000 records (name, abv, category and style) and being able to navigate them. NOTE: For this first example I will not be doing server side paging, filtering,… By the end of the experiment (I live in Europe) it was almost 1am and I went to sleep.

What did I need to write:

  1. Java Server Page (JSP) using KendoUI taglib (not much documentation on how to use it but looking their example was enough for me).
  2. Servlet invoked by KendoUI DataSource transport read for retrieving the data, this is Java and uses Couchbase Java Client Library.
  3. Couchbase view for extracting the list of beers (this is a MapReduce function).

Kendo UI JSP taglib

This is what I wrote.

<%@ page contentType="text/html;charset=UTF-8" language="java" %>
<%@ taglib prefix="kendo" uri="http://www.kendoui.com/jsp/tags" %>
<html>
<head>
    <title>Powered by Zafu: OnaBai 2012 (c)</title>
    <!-- Kendo UI Web styles-->
    <link href="styles/kendo.common.min.css" rel="stylesheet" type="text/css"/>
    <link href="styles/kendo.silver.min.css" rel="stylesheet" type="text/css"/>

    <!-- Kendo UI Web scripts-->
    <script src="js/jquery.min.js" type="text/javascript"></script>
    <script src="js/kendo.web.min.js" type="text/javascript"></script>

    <style type="text/css">
        html {
            font-family: "Arial", sans-serif;
            font-weight: 300;
            font-variant: normal;
            font-style: normal;
            font-size: 12px;
        }

        table[role="grid"] {
            font-size: 1em;
        }
    </style>
</head>
<body>
<kendo:window name="main" title="Powered by Zafu: OnaBai 2012 (c)" minHeight="450" minWidth="700" maxWidth="700">

    <kendo:grid name="grid" pageable="true" sortable="true" filterable="false" groupable="false">
        <kendo:grid-columns>
            <kendo:grid-column title="Name" field="name"/>
            <kendo:grid-column title="ABV" field="abv" format="{0:n1}" width="50px"/>
            <kendo:grid-column title="Style" field="style"/>
            <kendo:grid-column title="Category" field="category"/>
        </kendo:grid-columns>
        <kendo:dataSource pageSize="10">
            <kendo:dataSource-transport>
                <kendo:dataSource-transport-read url="/ListBeer" type="GET" contentType="application/json"/>
            </kendo:dataSource-transport>
            <kendo:dataSource-schema data="data" total="total" groups="data">
                <kendo:dataSource-schema-model>
                    <kendo:dataSource-schema-model-fields>
                        <kendo:dataSource-schema-model-field name="name" type="string"/>
                        <kendo:dataSource-schema-model-field name="abv" type="number"/>
                        <kendo:dataSource-schema-model-field name="style" type="string"/>
                        <kendo:dataSource-schema-model-field name="category" type="string"/>
                    </kendo:dataSource-schema-model-fields>
                </kendo:dataSource-schema-model>
            </kendo:dataSource-schema>
        </kendo:dataSource>
    </kendo:grid>
    <div style="position: absolute; bottom: 5px;">Powered by Zafu, Couchbase 2.0 & KendoUI</div>
</kendo:window>
</body>
</html>

This JSP is equivalent to this HTML (what I have had to write in the past).

<html>
<head>
    <title>Powered by Zafu: OnaBai 2012 (c)</title>
    <!-- Kendo UI Web styles-->
    <link href="styles/kendo.common.min.css" rel="stylesheet" type="text/css"/>
    <link href="styles/kendo.black.min.css" rel="stylesheet" type="text/css"/>

    <!-- Kendo UI Web scripts-->
    <script src="js/jquery.min.js" type="text/javascript"></script>
    <script src="js/kendo.web.min.js" type="text/javascript"></script>

    <style type="text/css">
        html {
            font-family: "Arial", sans-serif;
            font-weight: 300;
            font-variant: normal;
            font-style: normal;
            font-size: 12px;
        }

        table[role="grid"] {
            font-size: 1em;
        }
    </style>
    <script type="text/javascript">
        $(document).ready(function () {
            $("#main").kendoWindow({
                title:    "Powered by Zafu: OnaBai 2012 (c)",
                minHeight:450,
                minWidth: 700,
                maxWidth: 700
            });

            $("#grid").kendoGrid({
                columns:   [
                    { field:"name", title:"Name" },
                    { field:"abv", title:"ABV", format:"{0:n1}", width:"50" },
                    { field:"style", title:"Style", format:"{0:n1}" },
                    { field:"category", title:"Category", format:"{0:n1}" }
                ],
                pageable:  true,
                sortable:  true,
                filterable:false,
                groupable: false,
                dataSource:{
                    pageSize: 10,
                    transport:{
                        read:{
                            url:        "/ListBeer",
                            type:       "GET",
                            contentType:"application/json"
                        }
                    },
                    schema:   {
                        data:  "data",
                        total: "total",
                        groups:"data",
                        model: {
                            fields:{
                                name:    { type:"string" },
                                abv:     { type:"number" },
                                style:   { type:"string" },
                                category:{ type:"string" }
                            }
                        }
                    }
                }
            })
        });
    </script>
</head>
<body>
<div id="main">
    <div id="grid"></div>
    <div style="position: absolute; bottom: 5px;">Powered by Zafu, Couchbase 2.0 & KendoUI</div>
</div>
</body>
</html>

MapReduce

function (doc, meta) {
  if (doc.type && doc.type == "beer" && doc.name) {
     emit(doc.name, doc.id);
  }
}

Couchbase 2.0 Java Client: View invocation

    public List read(String key) throws Exception {
        View view = client.getView(ViewDocument, ViewName);

        if (view == null) {
            throw new Exception("View is null");
        }

        Query query = new Query();
        // Set the key for the query based on beer name
        if (key != null) {
            query.setKey(key);
        }
        query.setStale(Stale.FALSE);
        query.setIncludeDocs(true);
        query.setDescending(false);

        ViewResponse result = client.query(view, query);
        Iterator<ViewRow> itr = result.iterator();
        return IteratorUtils.toList(itr);
    }

Conclusion

Positive

  1. It works!
  2. It was not that hard!
  3. Both fit pretty nice and both are easy to start with!
  4. Even that tag libraries are pretty verbose having snippets you can type it quite fast.
  5. My IDE recognized KendoUI taglib and coloring and typing was pretty fast.

Negative

  1. KendoUI, please release Java 6 version (I know that it is pretty old but as you can see there people developing new products and  still using it).
  2. Couchbase, please upgrade to Java 7. Java 6 is pretty old otherwise it will look like Windows XP.

Pending

  1. Play with more widgets and server side paging / filtering / …
  2. See how it fits (if it actually does, I don’t think so) with my own Widgets (I have a few that I use a lot).

Neutral

  1. I think that would be nice a series of blogs exploiting the idea of JSP taglib… maybe I start one… is not that much the question of documentation as writing Guides on how to use if for practical cases.

KendoUI tips and tricks on Dates in a Grid


Have you ever tried to display a date in a Kendo UI Grid widget? It is possible but there are questions that you should keep in mind.

IMPORTANT: Next post explains how to display Time and Date Time Kendo UI widgets in a grid. Stay tuned!

Displaying a Date

Lets assume that we have the following JSON array (either I receive it from the server or it has been computed and stored in the array).

var entries = [
    { "name":"Dave Packard", "born":new Date(1912, 8,  7) },
    { "name":"Bill Hewlett", "born":new Date(1913, 4, 20) },
    { "name":"Larry Ellison","born":new Date(1944, 7, 17) },
    { "name":"Steve Jobs",   "born":new Date(1955, 1, 24) },
    { "name":"Bill Gates",   "born":new Date(1955, 9, 28) },
    { "name":"Jeff Bezos",   "born":new Date(1964, 0, 12) },
    { "name":"Larry Page",   "born":new Date(1973, 5, 26) },
    { "name":"Sergey Brin",  "born":new Date(1973, 7, 21) }
];

And I use the following grid for displaying the data:

var grid = $("#auth_tbl").kendoGrid({
    dataSource: { data: entries },
    editable: true,
    navigatable: true
});

I will get something like this:

And if I click on the date cell for editing it, I see:

Really easy. Well done!, Kendo UI team

KendoUI Formatting Dates on a Grid

Lets start doing some customizations. Something simple: set titles and choose the date representation as year-month-day, I.e. yyyy-MM-dd.

This is my new JavaScript code:

$("#auth_tbl").kendoGrid({
    dataSource: { data: entries },
    columns: [
        { field: "name", title: "Name" },
        { field: "born", title: "Born", format:"{0:yyyy-MM-dd}" }
    ],
    editable: true,
    navigatable: true
});

Now we can see that the format is the same when it is not in edit mode:

Than when it is:

Kendo UI folks: Thanks, again for making it simple!

KendoUI Grid dates are not Date Objects

Not everything is going to be that simple! Lets consider that I saved the dates as ISO 8601 (yyyy-MM-ddTHH:mm:ss.fffZ) and once I retrieve them I want to display them back.

Now, my entries are something like this:

var entries = [
    { "name":"Dave Packard", "born":"1912-09-06T22:00:00.000Z" },
    { "name":"Bill Hewlett", "born":"1913-05-19T22:00:00.000Z" },
    { "name":"Larry Ellison","born":"1944-08-16T22:00:00.000Z" },
    { "name":"Steve Jobs",   "born":"1955-02-23T23:00:00.000Z" },
    { "name":"Bill Gates",   "born":"1955-10-27T22:00:00.000Z" },
    { "name":"Jeff Bezos",   "born":"1964-01-11T23:00:00.000Z" },
    { "name":"Larry Page",   "born":"1973-06-25T23:00:00.000Z" },
    { "name":"Sergey Brin",  "born":"1973-08-20T23:00:00.000Z" }
];

and when I display it:

That is displayed as a string and not a date.

I need to convert it to a JavaScript Date Object that might be done in multiples ways:

  1. Do the conversion in model.transport.read.
  2. Do it in model.schema.data.
  3. Do it in model.schema.parse.

I opt for the last one since parse the response of my server, is exactly what I want to do.

Now, my Grid definition in JavaScript is:

$("#auth_tbl").kendoGrid({
    dataSource:{
        data:entries,
        schema:{
            parse:function (response) {
                $.each(response, function (idx, elem) {
                    if (elem.born && typeof elem.born === "string") {
                        elem.born = kendo.parseDate(elem.born, "yyyy-MM-ddTHH:mm:ss.fffZ");
                    }
                });
                return response;
            }
        }
    },
    columns:[
        { field:"name", title:"Name" },
        { field:"born", title:"Born", format:"{0:yyyy-MM-dd}" }
    ],
    editable:true,
    navigatable:true
});

What parse function does is receive the data from transport (in my case JSON entries array) and iterate on the elements and do the conversions.

NOTE: By default kendo.parseDate tries a series of formats depending on your culture and prebuilt ones BUT ISO 8601 as yyyy-MM-ddTHH:mm:ss.fffZ is not included. You can include them following my instruction posted here.

The result is (almost) the expected both in edit and not edit mode.

And I say almost since visually is correct BUT dates are not correct (one day less). The reason is a bug in KendoUI parseDate and ISO 8601 when it uses Zulu timezone where when building the Date object, it does not consider it as UTC. The fix is posted in here.

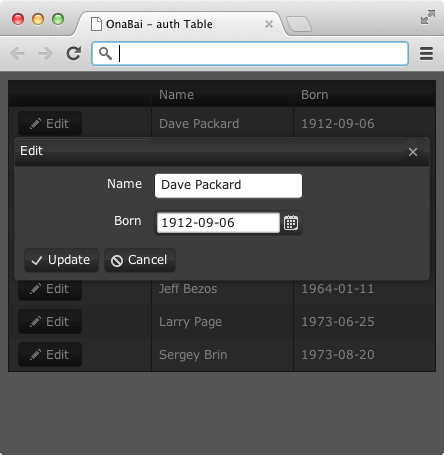
KendoUI Grid Dates in popup edit mode

What about if the edit is in popup mode?

The code would be like this:

$("#auth_tbl").kendoGrid({
    dataSource:{
        data:entries,
        schema:{
            parse:function (response) {
                $.each(response, function (idx, elem) {
                    if (elem.born && typeof elem.born === "string") {
                        elem.born = kendo.parseDate(elem.born, "yyyy-MM-ddTHH:mm:ss.fffZ");
                    }
                });
                return response;
            }
        }
    },
    columns:[
        { command:[ "edit" ] },
        { field:"name", title:"Name" },
        { field:"born", title:"Born", format:"{0:yyyy-MM-dd}" }
    ],
    editable:"popup",
    navigatable:true
});

And displayed I get:

Conclussions

  1. Define titles in KendoUI Grid columns options.
  2. Define date format in KendoUI Grid columns options.
  3. Data should be Objects since there is no conversion (guess) depending on the output format.
  4. Use dataSource.schema.parse function for converting data formats between transport format and and KendoUI Grid data formats.

Acknowledgements

Congratulations, Kendo UI team for making my life easier!

KendoUI Grid locally edited JSON


Defining the problem

I have a JSON array that I want to modify but even that is provided by a web server I don’t want to have every modification automatically synchronized (question of performance).
I do this, of course, because it is a small array with few entries and very few (expected) modifications. So there is no fear of loosing data if something goes wrong (even that it should not).
My requirements are:

  1. Display data in a grid.
  2. Edit the content of the grid cells.
  3. Remove rows.
  4. Some columns are calculated from other values in the same row.
  5. Being able to save modifications on demand.
  6. Should be able to revert any modification to the previous saving point.

KendoUI Grid and JSON edited locally

Kendo UI Grid is able to display bound JSON data, allowing you modify it and even save and cancel changes but for some sort of reason when I do this, I get duplicated rows when I do sync + cancel.
For this reason I end up defining my own commands for adding new records, delete, save changes and cancel changes.
The steps that I follow are:

  1. Define own commands in the toolbar.
  2. Define methods associated with the toolbar commands.
  3. Define methods for saving and restoring records (implement save and cancel changes).
  4. Put all pieces together

Define own commands in the toolbar

As shown in my post I just need to set toolbar to:

toolbar:[
    {
        name:"insert",
        text:"",
        className:"k-grid-insert-expense",
        imageClass:"k-icon ob-icon-only k-i-plus"
    },
    {
        name:"delete",
        text:"",
        className:"k-grid-delete-selected",
        imageClass:"k-icon ob-icon-only k-delete"
    },
    {
        name:"sync",
        text:"",
        className:"k-grid-sync-changes",
        imageClass:"k-icon ob-icon-only k-i-tick"
    },
    {
        name:"cancel",
        text:"",
        className:"k-grid-cancel-changes",
        imageClass:"k-icon ob-icon-only k-retry"
    }
]

Where we defines buttons for inserting a row, deleting the selected row, save changes (sync) and cancel changes. I’m using buttons without text since I like them more (see this post on how to do it).
Now, our interface looks like:

Define methods associated with the toolbar commands

What we do is bind a click event to toolbar.button.className.

// Custom grid command : insert
$(".k-grid-insert-expense").bind("click", function (ev) {
});

// Custom grid command : delete
$(".k-grid-delete-selected").bind("click", function (ev) {
});

// Custom grid command : sync
$(".k-grid-sync-changes").bind("click", function (ev) {
});

// Custom grid command : cancel
$(".k-grid-cancel-changes").bind("click", function (ev) {
});

Define methods for saving and restoring records (implement save and cancel changes)

This JavaScript class saves a copy of and Object on creation and then allows to save a new copy or retrieve the last saved one.

// Class for saving and restoring an Object
function SaveObject(obj) {
    // Saved Object
    this.object = null;

    // Save Object
    this.set = function (obj) {
        this.object = obj;
    };

    // Retrieve saved Object
    this.get = function () {
        return this.object;
    };
    this.set(obj);
}

The way of using it is invoking set when clicking sync button and invoking get when clicking on cancel button.
For sync’ing we get entries from stocksDataSource and save this value. We finish it invoking success for notifying the DataSource about the new data.

// Custom grid command : sync
$(".k-grid-sync-changes").bind("click", function (ev) {
    entries = stocksDataSource.data();
    savedArray.set(entries);
    stocksDataSource.success(entries);
});

For restoring, we set entries to saved data and then invoke cancelChanges from KendoUI Grid object.

// Custom grid command : cancel
$(".k-grid-cancel-changes").bind("click", function (ev) {
    entries = savedArray.get();
    grid.cancelChanges();
});

Put all pieces together

This is almost done but we have to implement add record and delete selected record.
Adding record is invoking addRow method in grid object.

// Custom grid command : insert
$(".k-grid-insert-expense").bind("click", function (ev) {
    grid.addRow();
});

Removing is detecting which row is selected and then invoking removeRow in grid object.

// Custom grid command : delete
$(".k-grid-delete-selected").bind("click", function (ev) {
    var selected = grid.select();
    if (selected && selected.length > 0) {
        grid.removeRow(grid.select());
    }
});

And that’s all folks!!! You can see it running here.

KendoUI DatePicker input not editable


Might seem counterintuitive but many webs prompting for dates, disable the edit field in order to prevent the user from introducing an incorrect date, forcing you to use a calendar widget.
It is pretty simple getting the same effect while using KendoUI DatePicker widget.

Non editable KendoUI DatePicker input

Add readonly=”readonly” to the input field definition.

<input id="cal" readonly="readonly"/>

and invoke KendoUI DatePicker widget initialization as:

$("#cal").kendoDatePicker({});

Et voilà!