KendoUI DataSources + Dropbox DataStore: Change Listener


My last posts were about Dropbox DataStore and Kendo UI DataSource. I have demonstrated how to read, create, delete and update records.

And I have shown how the original example provided with Dropbox was able to listen for changes in my application and automatically synchronize those changes.

I want to do the same! When Dropbox sample code changes the DataStore content, I want that my grid automatically gets updated.

Event listeners in DataStore Dropbox

We have seen in previous videos how when we create, update or delete a record from our Grid, the HTML sample code from Dropbox magically gets updated. This is because Dropbox provide a mechanism for registering a function (a listener) to changes in the DataStore. What Dropbox library does is that when you updates the copy in Dropbox server, it notifies the library and this calls you.

dataStore.recordsChanged.addListener(function(ev) {
    // Event handler code...
});

What we do in this event handler is either getting the changes and update the affected rows or fully update the table.

In my case and for simplicity, I’m going to update the complete Grid by invoking `DataSource.read()` method. Something like:

// Add listener for changes
dataStore.recordsChanged.addListener(function(ev) { taskTableDS.read() });

NOTE: If I just add these lines of code to what I have in my previous post, I will get an error because in the current implementation I was expecting that the DataStore was opened only one: so I was not closing it and I could try opening it twice if DataStore.read happen to be called twice.

So I need to slightly change readTask code to control that the DataStore is alreayd open and not try to do it again.

function readTasks(op) {
    if (client.isAuthenticated()) {
        // Client is authenticated. Display UI.
        if (dataStore === null) {
            var datastoreManager = client.getDatastoreManager();
            datastoreManager.openDefaultDatastore(function (error, datastore) {
                if (error) {
                    alert('Error opening default datastore: ' + error);
                }
                dataStore = datastore;

                // Add listener for changes
                dataStore.recordsChanged.addListener(function (ev) { taskTableDS.read() });

                taskTable = datastore.getTable('tasks');
                op.success(taskTable.query());
            });
        } else {
            op.success(taskTable.query());
        }
    }
}

And the complete code is:

// Insert your Dropbox app key here:
var DROPBOX_APP_KEY = '0sh....';

// Exposed for easy access in the browser console.
var client = new Dropbox.Client({key: DROPBOX_APP_KEY});
var taskTable = null;
var dataStore = null;

// Try to finish OAuth authorization.
client.authenticate({interactive: true}, function (error) {
    if (error) {
        alert('Authentication error: ' + error);
    }
});

function parseItem(elem) {
    return {
        id       : elem.getId(),
        taskname : elem.get("taskname"),
        created  : elem.get("created"),
        completed: elem.get("completed")
    };
}

function readTasks(op) {
    if (client.isAuthenticated()) {
        // Client is authenticated. Display UI.
        if (dataStore === null) {
            var datastoreManager = client.getDatastoreManager();
            datastoreManager.openDefaultDatastore(function (error, datastore) {
                if (error) {
                    alert('Error opening default datastore: ' + error);
                }
                dataStore = datastore;

                // Add listener for changes
                dataStore.recordsChanged.addListener(function (ev) { taskTableDS.read() });

                taskTable = datastore.getTable('tasks');
                op.success(taskTable.query());
            });
        } else {
            op.success(taskTable.query());
        }
    }
}

function parseDropboxRecords(d) {
    var res = [];
    $.each(d, function (idx, elem) {
        res.push(parseItem(elem));
    });
    return (res);
}

var taskTableDS = new kendo.data.DataSource({
    transport: {
        read   : function (op) {
            readTasks(op);
        },
        update : function (op) {
            var data = op.data;
            var id = data.id;
            // Remove id to do not have it duplicated
            delete op.data.id;
            var record = taskTable.get(id).update(data);
            op.success([record]);
        },
        destroy: function (op) {
            taskTable.get(op.data.id).deleteRecord();
            op.success();
        },
        create : function (op) {
            // Remove id to do not have it duplicated
            delete op.data.id;
            var record = taskTable.insert(op.data);
            op.success([record]);
        }
    },
    schema   : {
        model: {
            id    : "id",
            fields: {
                id       : { type: "string" },
                taskname : { type: "string" },
                created  : { type: "date", editable: false },
                completed: { type: "boolean" }
            }
        },
        parse: parseDropboxRecords
    }
});

$("#grid").kendoGrid({
    dataSource: taskTableDS,
    editable  : "popup",
    toolbar   : ["create"],
    columns   : [
        { command: ["edit", "destroy"], width: 180 },
        { field: "taskname", width: 80 },
        { field: "created", format: "{0:G}", width: 200 },
        { field: "completed", width: 70 }
    ]
});

Which looks like:
KendoUI DataSources + Dropbox DataStore: Create


After checking how to read data from Dropbox DataStore, update, and delete. It is time for creating new records.

Creating records into Dropbox DataStore from KendoUI Grid

Now, the important question to remember is that when KendoUI creates a record in a Grid, the value assigned to id is default value defined in the model, which typically is not defined and as consequence stays to null.

But, when the record is created in the server, it has to return an id not null to be used.

Grid modification for creating

What I am going to do is adding a button to the toolbar for creating a new record. Something like:

$("#grid").kendoGrid({
    dataSource: taskTableDS,
    editable  : "popup",
    toolbar   : ["create"],
    columns   : [
        { command: ["edit", "destroy"], width: 180 },
        { field: "taskname", width: 80 },
        { field: "created", format: "{0:G}", width: 200 },
        { field: "completed", width: 70 }
    ]
});

First step easy!

Add create method to transport

Now, the second step is adding the transport.create method that saves the data into Dropbox (using insert method) and informs KendoUI about the id of the newly created record.

create : function (op) {
    // Remove id to do not have it duplicated
    delete op.data.id;
    var record = taskTable.insert(op.data);
    op.success([record]);
}

It is important to note that KendoUI success will actually call schema.model.parse for converting record from Dropbox format into KendoUI format.

parse: function (d) {
        var res = [];
        $.each(d, function (idx, elem) {
            res.push(parseItem(elem));
        });
        return (res);
}

Now, the complete code of the example is:

// Insert your Dropbox app key here:
var DROPBOX_APP_KEY = '0sh............';

// Exposed for easy access in the browser console.
var client = new Dropbox.Client({key: DROPBOX_APP_KEY});
var taskTable = null;

// Try to finish OAuth authorization.
client.authenticate({interactive: true}, function (error) {
    if (error) {
        alert('Authentication error: ' + error);
    }
});

function parseItem(elem) {
    return {
        id       : elem.getId(),
        taskname : elem.get("taskname"),
        created  : elem.get("created"),
        completed: elem.get("completed")
    };
}

function readTasks(op) {
    if (client.isAuthenticated()) {
        // Client is authenticated. Display UI.
        var datastoreManager = client.getDatastoreManager();
        datastoreManager.openDefaultDatastore(function (error, datastore) {
            if (error) {
                alert('Error opening default datastore: ' + error);
            }
            taskTable = datastore.getTable('tasks');
            var records = taskTable.query();
            op.success(records);
        });
    }
}

var taskTableDS = new kendo.data.DataSource({
    transport: {
        read   : function (op) {
            readTasks(op);
        },
        update : function (op) {
            var data = op.data;
            var id = data.id;
            // Remove id to do not have it duplicated
            delete op.data.id;
            var record = taskTable.get(id).update(data);
            op.success([record]);
        },
        destroy: function (op) {
            taskTable.get(op.data.id).deleteRecord();
            op.success();
        },
        create : function (op) {
            // Remove id to do not have it duplicated
            delete op.data.id;
            var record = taskTable.insert(op.data);
            op.success([record]);
        }
    },
    schema   : {
        model: {
            id    : "id",
            fields: {
                id       : { type: "string" },
                taskname : { type: "string" },
                created  : { type: "date", editable: false },
                completed: { type: "boolean" }
            }
        },
        parse: function (d) {
            var res = [];
            $.each(d, function (idx, elem) {
                res.push(parseItem(elem));
            });
            return (res);
        }
    }
});

$("#grid").kendoGrid({
    dataSource: taskTableDS,
    editable  : "popup",
    toolbar   : ["create"],
    columns   : [
        { command: ["edit", "destroy"], width: 180 },
        { field: "taskname", width: 80 },
        { field: "created", format: "{0:G}", width: 200 },
        { field: "completed", width: 70 }
    ]
});

And the example looks like:

KendoUI DataSources + Dropbox DataStore: Delete


After seeing first how to read data from Dropbox DataStore into Kendo UI DataSource and then how to update it, now it is time for deleting records.

Deleting records from Dropbox DataStore

Start adding a delete button to the Grid.

$("#grid").kendoGrid({
    dataSource: taskTableDS,
    editable  : "inline",
    columns   : [
        { command: ["edit", "destroy"], width: 180 },
        { field: "taskname", width: 80 },
        { field: "created", format: "{0:G}", width: 200 },
        { field: "completed", width: 70 }
    ]
});

Deleting a record from DropBox is actually pretty simple, just invoke deleteRecord and it is gone! Then invoke success in Kendo UI side and also gone from Kendo UI DataSource.

So, my DataSource transport.destroy method is:

destroy: function (op) {
    taskTable.get(op.data.id).deleteRecord();
    op.success();
}

And the complete code is:

// Insert your Dropbox app key here:
var DROPBOX_APP_KEY = '0sh............';

// Exposed for easy access in the browser console.
var client = new Dropbox.Client({key: DROPBOX_APP_KEY});
var taskTable = null;

// Try to finish OAuth authorization.
client.authenticate({interactive: true}, function (error) {
    if (error) {
        alert('Authentication error: ' + error);
    }
});

function parseItem(elem) {
    return {
        id       : elem.getId(),
        taskname : elem.get("taskname"),
        created  : elem.get("created"),
        completed: elem.get("completed")
    };
}

function readTasks(op) {
    if (client.isAuthenticated()) {
        // Client is authenticated. Display UI.
        var datastoreManager = client.getDatastoreManager();
        datastoreManager.openDefaultDatastore(function (error, datastore) {
            if (error) {
                alert('Error opening default datastore: ' + error);
            }
            taskTable = datastore.getTable('tasks');
            var records = taskTable.query();
            op.success(records);
        });
    }
}

var taskTableDS = new kendo.data.DataSource({
    transport: {
        read   : function (op) {
            readTasks(op);
        },
        update : function (op) {
            var data = op.data;
            var id = data.id;
            // Remove id to do not have it duplicated
            delete op.data.id;
            var record = taskTable.get(id).update(data);
            op.success([record]);
        },
        destroy: function (op) {
            taskTable.get(op.data.id).deleteRecord();
            op.success();
        }
    },
    schema   : {
        model: {
            id    : "id",
            fields: {
                id       : { type: "string" },
                taskname : { type: "string" },
                created  : { type: "date", editable: false },
                completed: { type: "boolean" }
            }
        },
        parse: function (d) {
            var res = [];
            $.each(d, function (idx, elem) {
                res.push(parseItem(elem));
            });
            return (res);
        }
    }
});

$("#grid").kendoGrid({
    dataSource: taskTableDS,
    editable  : "popup",
    columns   : [
        { command: ["edit", "destroy"], width: 180 },
        { field: "taskname", width: 80 },
        { field: "created", format: "{0:G}", width: 200 },
        { field: "completed", width: 70 }
    ]
})

What I get is:

KendoUI DataSources + Dropbox DataStore: Update


In my previous post I showed you how to read data from Dropbox DataStore. Now, it is time for updating it.

Kendo UI DataSource and Dropbox DataStore: Updating

Reading data was pretty simple, we used openDefaultDatastore for getting access to the DataStore, then getTable for accessing the table and finally query for retrieving the selected data.

When we get to update there are two main modes that we might choose:

  1. Save each field of a record independently using set: which might be fine for attributes on a structure.
  2. Use update for updating a record in a single transaction.

For my grid, I opted for the second, despite some fields might not have changed I do prefer to transfer all and reduce number of transaction with Dropbox server. Actually, there is a second reason that is that KendoUI keeps track of dirty records but not dirty fields.

DataSource grid editable

Now, my Grid definition is:

$("#grid").kendoGrid({
    dataSource: taskTableDS,
    editable  : "popup",
    columns   : [
        { command: ["edit" ], width: 90 },
        { field: "taskname", width: 80 },
        { field: "created", format: "{0:G}", width: 200 },
        { field: "completed", width: 70 }
    ]
})

The difference is that I’ve added a button edit for opening a popup window where I can edit the record.

Now, I should work in the KendoUI DataSource transport.update method.

DataSource transport update

Updating a record in Dropbox server is basically transforming the data from KendoUI DataSource format into Dropbox DataStore keeping in mind a couple of questions.

  1. If the JSON field containing the new record data contains an attribute called id, then Dropbox will save it as attribute but this is not going to be the same than the id that Dropbox uses for the record. So for having it nicer, I’m going to delete the id from the JSON before sending it to Dropbox server.
  2. The result of updating the record is expected to be sent to KendoUI invoking success or error on the object received as argument of KendoUI transport.update
update : function (op) {
    var data = op.data;
    var id = data.id;
    // Remove id to do not have it duplicated
    delete op.data.id;
    var record = taskTable.get(id).update(data);
    op.success([record]);
},

Now, I can update my grid records and I will see them immediately updated in Dropbox example of task list.

As you can see, since Dropbox example adds listener for detecting changes done by other devices or application, what I modify in KendoUI grid is immediately visible in their example but not viceversa (stay tuned since I will get there).

Zafu: KendoUI JSP autocomplete revisited


In Zafu: KendoUI JSP taglib + Couchbase (3) I have explained how to implement an autocomplete for accessing the name of the beers of Couchbase sample-beer database. That time I have used a pretty complex structure for mapping KendoUI filter.

But if the only thing that I need is sending whatever the user has typed so far, might not be worthwhile using such complex structure. If that’s your case, this is what you have to do.

Redefine parameterMap

In the previous post I have used the following function for generating the parameters to send to the server.

function kendoJson(d, t) {
    return "param=" + JSON.stringify(d);
}

Now, I have redefined it as:

function kendoJson(d, t) {
    return "name=" + d.filter.filters[0].value + "&limit=" + d.take;
}

I.e., only send the data typed so far as a parameter called name and limit as the number of results that is the value defined in kendo:dataSource JSP tag.

Get the parameters in the server

In the server now the parameters are much easier to retrieve since they arrive as two different parameters with the names name and limit.

String name = request.getParameter("name");
int limit = 10;
System.out.println("Limit:" + request.getParameter("limit"));
if (request.getParameter("limit") != null) {
    try {
        limit = Integer.parseInt(request.getParameter("limit"));
    } catch (Exception e) {
        e.printStackTrace();
    }
}

And then invoke the query as we explained in the last post:

Query query = new Query();
query.setIncludeDocs(false);
query.setStale(Stale.FALSE);
query.setDescending(false);
query.setReduce(false);
query.setSkip(0);
query.setLimit(limit);
query.setRangeStart(name)
ViewResponse result = client.query(view, query);
Iterator itr = result.iterator();

Zafu: KendoUI JSP taglib + Couchbase (2)


Just a few hours after being presented KendoUI Q3 I wrote the first post on KendoUI JSP wrapper. It was a pretty simple grid that retrieved data from Couchbase 2.0. That first post showed how to get data from a Couchbase 2.0 view and displayed it in a grid doing the paging in the client. In that example that meant transfer almost 6000 records and then do the paging in the browser -not very smart for such volume-. This time, I will implement the paging in the server and transfer only a small group of records.

Zafu server-side paging

Step one, a brief introduction to what we need for implementing server-side paging and what KendoUI and Couchbase.

KendoUI server-side paging

Configuring a KendoUI grid for server-side paging is as easy as defining serverPaging as true in the DataSource definition used by our Grid (see documentation here or here). Something like:

<kendo:dataSource pageSize="10" serverPaging="true">
    <kendo:dataSource-transport>
        <kendo:dataSource-transport-read url="/ListBeer" type="GET"/>
    </kendo:dataSource-transport>
    <kendo:dataSource-schema data="data" total="total" groups="data">
        <kendo:dataSource-schema-model>
            <kendo:dataSource-schema-model-fields>
                <kendo:dataSource-schema-model-field name="name" type="string"/>
                <kendo:dataSource-schema-model-field name="abv" type="number"/>
                <kendo:dataSource-schema-model-field name="style" type="string"/>
                <kendo:dataSource-schema-model-field name="category" type="string"/>
            </kendo:dataSource-schema-model-fields>
        </kendo:dataSource-schema-model>
    </kendo:dataSource-schema>
</kendo:dataSource>

In the previous definition I specify both that the server will do paging (send a page at a time) and the size of each page defined in pageSize (defined as 10 in the previous example).

But, in addition when the DataSource loads data, it also needs to specify the number of records to skip from the dataset. What I will get in my servlet /ListBeer is four tuples of paramater-value:

  1. take the number of records to retrieve.
  2. skip the number of records to skip from the beginning of the DataSet.
  3. page the index of the current page.
  4. pageSize the number of records displayed on each page.

Couchbase 2.0 server-side paging

When we build a query in Couchbase 2.0, we define a series of parameter to configure it. This includes:

  1. setSkip for defining the number of elements to skip.
  2. setLimit for defining the number of records to retrieve.

The mapping between KendoUI and Couchbase 2.0 paging parameters is easy: KendoUI:skip maps into Couchbase:skip and KendoUI:take maps into Couchbase:limit.

New Java read code

The new read function (defined in the previous post) now is as follow:

public List read(String key, int skip, int limit) throws Exception {
    View view = client.getView(ViewDocument, ViewName);

    if (view == null) {
        throw new Exception("View is null");
    }

    Query query = new Query();
    if (key != null) {
        query.setKey(key);
    }
    if (skip >= 0) {
        query.setSkip(skip);
    }
    if (limit >= 0) {
        query.setLimit(limit);
    }
    query.setStale(Stale.FALSE);
    query.setIncludeDocs(true);
    query.setDescending(false);
    query.setReduce(false);

    ViewResponse result = client.query(view, query);
    Iterator<ViewRow> itr = result.iterator();
    return IteratorUtils.toList(itr);
}

Where skip is what I get in the servlet as request.getParameter(“skip”) and limit is request.getParameter(“take”).

First “problem” in KendoUI wrapper

NOTE: Please, remember that KendoUI JSP wrapper is a beta release which means (according the Wikipedia):

Beta (named after the second letter of the Greek alphabet) is the software development phase following alpha. It generally begins when the software is feature complete. Software in the beta phase will generally have many more bugs in it than completed software, as well as speed/performance issues. The focus of beta testing is reducing impacts to users, often incorporating usability testing. The process of delivering a beta version to the users is called beta release and this is typically the first time that the software is available outside of the organization that developed it.

So, having defects is not bad, it is something that we cannot avoid, and as far as it is usable (and so far it is) and the defects get fixed by the time the final release is introduced it is completely understandable.

The defect is the way we receive the parameters that is different that for traditional HTML / JavaScript usage but also a little odd.

Parameters in KendoUI HTML / Javascript

Parameters are sent to the server (unless you define your own parameter mapping) encoded in the URL as url?param1=value1&param2=value2&… (Ex: /ListBeer?pageSize=10&take=10&skip=0&page=1).

Parameters in KendoUI JSP wrapper

Parameters are sent to the server (unless you define your own parameter mapping) as a stringified JSON and this as a parameter: url?{param1:value1,param2:value2,…} (Ex: /ListBeer?{pageSize:10,take:10,skip:0,page:1}=).

And here I have two concerns:

  1. I should not change my servlet no mather I user HTML/JavaScript, ASP wrapper, JSP wrapper,…
  2. Sending a string serialized JSON object as a parameter name is not nice, if I want to send it as JSON I will send it in the value side of a parameter and not the name side.

Workaround

Have 2 different servlets (code paths) for parsing parameters:

  1. HTML/JavaScript
  2. JSP wrapper.

Fixes

  1. KendoUI fixes TransportTag.doEndTag to do not define as default parameterMap function a JSON.stringify but leave it empty (this is something that we **cannot do**).
  2. Define our own parameter map that sends the parameters encoded in the URL as HTML 5 / JavaScript does or as JSON but in the value side and with well-known parameter name.

Which one I do recommend…? Fix 1, and while KendoUI provide us a patched version, you fix it or you go with Fix 2.

<script type="text/javascript">
    function encodeParametersAsJSON(param) {
        return "param=" + JSON.stringify(param);
    }
</script>
...
<kendo:dataSource-transport parameterMap="encodeParametersAsJSON">
    <kendo:dataSource-transport-read url="/ListBeer" type="GET"/>
</kendo:dataSource-transport>

I do not recommend Workaround since you have to duplicate your java code.

KendoUI TimePicker and DateTimePicker in Grid: Yes, we can!


KendoUI has widgets for Time and DateTime but you cannot use them in a Grid: this is pretty common when you introduce features in an existing product and it is not that easy fix modifying the sources. So, how can we get it?

KendoUI TimePicker and DateTimePicker in a Grid

Background

Lets review some of the tools that KendoUI provide us for solving this problem:

  1. Supported data types.
  2. Formatting.
  3. Editing templates.

KendoUI supported data types

Don’t look for it, there is no data type for time (according to KendoUI documentation you have: "string""number""boolean" and "date") but date includes time. This in not bad since we should understand that the widgets refer to visual representation and not data storing.

Then we should use date (no matter if we define the field using Schema Model in a DataSource or just store the data in the JSON array).
In the example we will display using a KendoUI grid the following JSON object:

var entries = [
    { "city":"Boston", "time":"10:14", datetime: "2012-08-28T10:14:00.000Z" },
    { "city":"Kyoto", "time":"23:14", datetime: "2012-08-28T23:14:00.000Z"},
    { "city":"La Paz", "time":"10:14", datetime: "2012-08-28T10:14:00.000Z"},
    { "city":"San Francisco", "time":"07:14", datetime: "2012-08-28T07:14:00.000Z"},
    { "city":"Salt Lake City", "time":"08:14", datetime: "2012-08-28T08:14:00.000Z"},
    { "city":"Salvador", "time":"11:14", datetime: "2012-08-28T11:14:00.000Z"},
    { "city":"Salzburg", "time":"16:14", datetime: "2012-08-28T16:14:00.000Z" },
    { "city":"San Diego", "time":"07:14", datetime: "2012-08-28T07:14:00.000Z" }
];

KendoUI cell formatting

Next is since we are using a Date object is choose how to represent the data (format). For this the easiest way is using format option in columns, something like this:

columns:[
    { field:"city", title:"City" },
    { field:"time", title:"Time", format:"{0:HH:mm}" },
    { field:"datetime", title:"Date - Time", format:"{0:yyyy-MM-dd HH:mm}" }
],

For time field, I have chosen to display the hour between 0-23  (HH) and minutes (mm) while for Date-Time, I have chosen four digits year (yyyy), month as digit between 1 and 12 and day of the month (dd) plus hours and minutes.

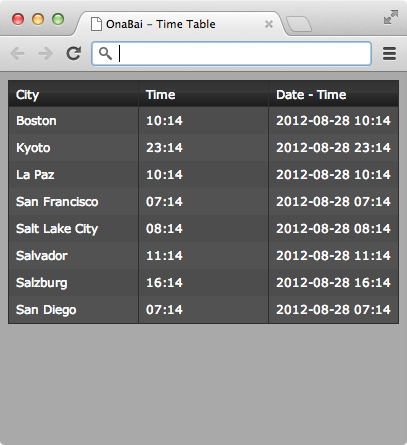
Using this I get the following grid:

KendoUI Grid with Date and Date-Time cells

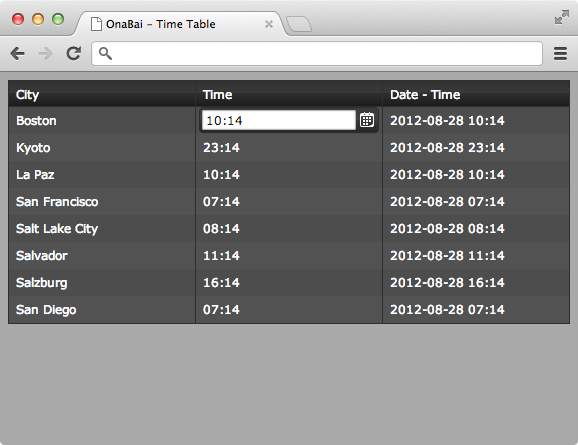
Now, the question is when editing what I get is:

KendoUI DatePicker used for time field.

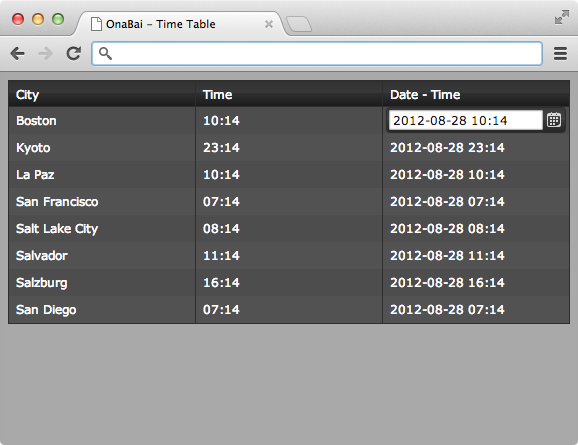
and this:

KendoUI DatePicker used for date-time field.

Both for field time and datetime the widget is a kendoDatePicker but not the kendoTimePicker and kendoDateTimePicker that we would like.

NOTE: this is actually understandable since JavaScript dates are mapped into kendoDatePicker.

KendoUI get kendoTimePickers and kendoDateTimePickers in a Grid

First is using the editor option in KendoUI Grid Columns definition (see this for documentation) that is a function that shall generated required HTML for getting the editor.

Following, the new Columns definition:

columns:[
    { field:"city", title:"City" },
    { field:"time", title:"Time", format:"{0:HH:mm}", editor: timeEditor },
    { field:"datetime", title:"Date - Time", format:"{0:yyyy-MM-dd HH:mm}", editor: dateTimeEditor }
],

Where I have defined a timeEditor function for time field and a dateTimeEditor function for datetime field.

And these functions are defined as:

function timeEditor(container, options) {
    $('<input data-text-field="' + options.field + '" data-value-field="' + options.field + '" data-bind="value:' + options.field + '" data-format="' + options.format + '"/>')
            .appendTo(container)
            .kendoTimePicker({});
}

function dateTimeEditor(container, options) {
    $('<input data-text-field="' + options.field + '" data-value-field="' + options.field + '" data-bind="value:' + options.field + '" data-format="' + options.format + '"/>')
            .appendTo(container)
            .kendoDateTimePicker({});
}

These functions receive two arguments:

  1. container: is the HTML element where we should introduce the input.
  2. options: options including information as the name of the field.

So, I generate and input field that includes the name of the field got from options and as format the same used when displaying the value.
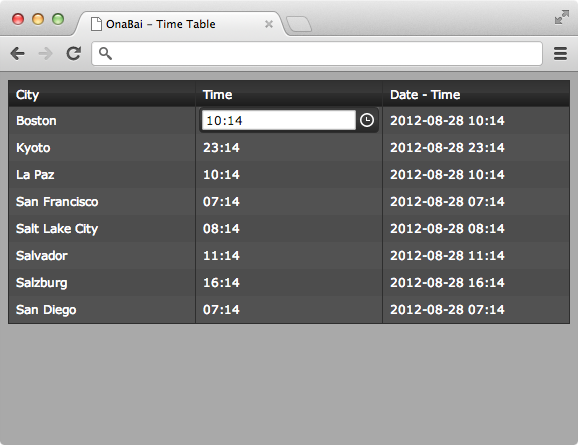
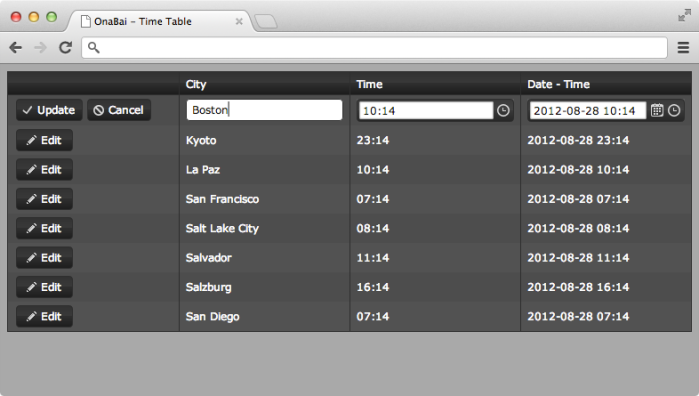
Now, my fields while editing are:

KendoUI TimePicker in a Grid

And this:

KendoUI Grid with Date and Date-Time cells

And in popup mode:

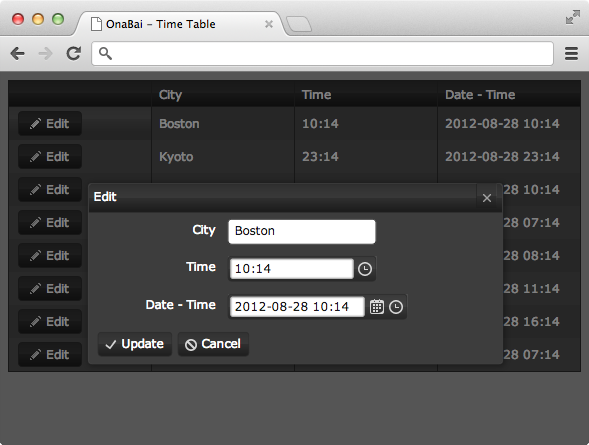
KendoUI TimePicker and DateTimePicker in a Grid

KendoUI Grid locally edited JSON


Defining the problem

I have a JSON array that I want to modify but even that is provided by a web server I don’t want to have every modification automatically synchronized (question of performance).
I do this, of course, because it is a small array with few entries and very few (expected) modifications. So there is no fear of loosing data if something goes wrong (even that it should not).
My requirements are:

  1. Display data in a grid.
  2. Edit the content of the grid cells.
  3. Remove rows.
  4. Some columns are calculated from other values in the same row.
  5. Being able to save modifications on demand.
  6. Should be able to revert any modification to the previous saving point.

KendoUI Grid and JSON edited locally

Kendo UI Grid is able to display bound JSON data, allowing you modify it and even save and cancel changes but for some sort of reason when I do this, I get duplicated rows when I do sync + cancel.
For this reason I end up defining my own commands for adding new records, delete, save changes and cancel changes.
The steps that I follow are:

  1. Define own commands in the toolbar.
  2. Define methods associated with the toolbar commands.
  3. Define methods for saving and restoring records (implement save and cancel changes).
  4. Put all pieces together

Define own commands in the toolbar

As shown in my post I just need to set toolbar to:

toolbar:[
    {
        name:"insert",
        text:"",
        className:"k-grid-insert-expense",
        imageClass:"k-icon ob-icon-only k-i-plus"
    },
    {
        name:"delete",
        text:"",
        className:"k-grid-delete-selected",
        imageClass:"k-icon ob-icon-only k-delete"
    },
    {
        name:"sync",
        text:"",
        className:"k-grid-sync-changes",
        imageClass:"k-icon ob-icon-only k-i-tick"
    },
    {
        name:"cancel",
        text:"",
        className:"k-grid-cancel-changes",
        imageClass:"k-icon ob-icon-only k-retry"
    }
]

Where we defines buttons for inserting a row, deleting the selected row, save changes (sync) and cancel changes. I’m using buttons without text since I like them more (see this post on how to do it).
Now, our interface looks like:

Define methods associated with the toolbar commands

What we do is bind a click event to toolbar.button.className.

// Custom grid command : insert
$(".k-grid-insert-expense").bind("click", function (ev) {
});

// Custom grid command : delete
$(".k-grid-delete-selected").bind("click", function (ev) {
});

// Custom grid command : sync
$(".k-grid-sync-changes").bind("click", function (ev) {
});

// Custom grid command : cancel
$(".k-grid-cancel-changes").bind("click", function (ev) {
});

Define methods for saving and restoring records (implement save and cancel changes)

This JavaScript class saves a copy of and Object on creation and then allows to save a new copy or retrieve the last saved one.

// Class for saving and restoring an Object
function SaveObject(obj) {
    // Saved Object
    this.object = null;

    // Save Object
    this.set = function (obj) {
        this.object = obj;
    };

    // Retrieve saved Object
    this.get = function () {
        return this.object;
    };
    this.set(obj);
}

The way of using it is invoking set when clicking sync button and invoking get when clicking on cancel button.
For sync’ing we get entries from stocksDataSource and save this value. We finish it invoking success for notifying the DataSource about the new data.

// Custom grid command : sync
$(".k-grid-sync-changes").bind("click", function (ev) {
    entries = stocksDataSource.data();
    savedArray.set(entries);
    stocksDataSource.success(entries);
});

For restoring, we set entries to saved data and then invoke cancelChanges from KendoUI Grid object.

// Custom grid command : cancel
$(".k-grid-cancel-changes").bind("click", function (ev) {
    entries = savedArray.get();
    grid.cancelChanges();
});

Put all pieces together

This is almost done but we have to implement add record and delete selected record.
Adding record is invoking addRow method in grid object.

// Custom grid command : insert
$(".k-grid-insert-expense").bind("click", function (ev) {
    grid.addRow();
});

Removing is detecting which row is selected and then invoking removeRow in grid object.

// Custom grid command : delete
$(".k-grid-delete-selected").bind("click", function (ev) {
    var selected = grid.select();
    if (selected && selected.length > 0) {
        grid.removeRow(grid.select());
    }
});

And that’s all folks!!! You can see it running here.

KendoUI Grid Toolbar button with icon only


In my post about KendoUI Grid and locally edited JSON, I presented a way of displaying a button in the toolbar without text by playing with the styles and using one jQuery command for finding which buttons.
This method requires:

  1. In the definition of the button set test to an empty string (“”).
  2. Add a class mark-up to imageClass for selecting wich buttons should not have text.
  3. Remove extra padding with a jQuery command after the initialization of the Grid.

Even that I get what I want, the fact of having the text set to an empty string and the extra jQuery instruction might be considered some sort of ugly solution.
Here I introduce a way of getting the same using templates.

Use template in KendoUI Grid buttons for displaying icon and no text

Define a CSS style that fixes the extra padding in the original style definition of the buttons.

.ob-icon-only {
    padding-right: 2px;
}

Define the button in the toolbar as:

{
    name:&quot;foobar&quot;,
    text:&quot;Foo Bar&quot;,
    imageClass:&quot;k-icon k-i-custom&quot;,
    template:$(&quot;#toolbar-icon-only&quot;).html()
}

and add in the HTML of your page:

&lt;script type=&quot;text/x-kendo-template&quot; id=&quot;toolbar-icon-only&quot;&gt;
    &lt;a class=&quot;k-button k-button-icontext ob-icon-only k-grid-#= name #&quot; href=&quot;\#&quot;&gt;
        &lt;span class=&quot;#= imageClass #&quot;&gt;&lt;/span&gt;
    &lt;/a&gt;
&lt;/script&gt;

Magically the template is applied to the button and it does not contain the text defined in the button of the toolbar. NOTE: In opposition to the alternative method, defining text does not affect the final result.

Conclusion, this is an alternative way of getting the same result and I’m not sure if this is better, cleaner, faster… choose whichever you prefer.

KendoUI Grid Toolbar


Continuing with the tutorial about KendoUI Grid with locally edited JSON data (see here for the first part), I will show you how to customize the toolbar for showing only icon (without text). This is something not officially supported but can be easily done.

Basic Toolbar actions

KendoUI grid predefines 4 actions in the toolbar:

  • Create
  • Cancel
  • Save
  • Destroy

Even when it seems that destroy does nothing since the official way of removing a row is adding a remove button on each row (something that visually I don’t like).
Getting the Toolbar displayed is as simple as adding toolbar: [ “create”, “cancel”, “save”, “destroy” ] as a configuration option into KendoUI Grid initialization.

$("#stocks_tbl").kendoGrid({
    dataSource:stocksDataSource,
    columns:[
        { field:"symbol", title:"Symbol" },
        { field:"price", title:"Price", attributes:{class:"ob-right"}, format:"{0:c2}" },
        { field:"shares", title:"Shares", attributes:{class:"ob-right"}, format:"{0:n2}" },
        { field:"total", title:"Total", attributes:{class:"ob-right"}, format:"{0:c2}" }
    ],
    toolbar: [
        "create", "cancel", "save", "destroy"
    ],
    editable:true,
    navigatable:true,
    pageable:{
        input:true,
        numeric:true
    }
}).data("kendoGrid");

Getting…

Adding custom actions to the toolbar

Pretty straightforward, add new entries to toolbar array toolbar: [ “create”, “cancel”, “save”, “destroy”, “edit”], but this shows a button without an icon (and actually no action associated).
Instead of just adding the label, lets add an object with additional properties…

toolbar: [
    "create", "cancel", "save", "destroy",
    {
        name: "foobar",
        text: "Foo Bar",
        imageClass:"k-icon k-i-custom"

    }
]

I have defined an action named foobar which text is Foo Bar and is displayed with an icon on the left identified from KendoUI sprite file as k-i-custom.
NOTE: See this for a list of (some) KendoUI icons. The complete list is in your styles/kendo.*.css files.
Now, you should see:

Removing text from custom action

Oops! seems pretty basic but KendoUI guys still do not support it. Don’t worry! It’s easily achievable…
Leave text empty:

toolbar: [
    "create", "cancel", "save", "destroy",
    {
        name: "foobar",
        text: "",
        imageClass:"k-icon k-i-custom"

    }
]

And you get…

Ummm! something is wrong. If you pay some close attention to it, you will see that the button is wider (than needed). KendoUI defines extra padding between text and right border of the button since they do not expect to remove the text.
Let’s fix it by adding to imageClass one extra value ob-icon-only but this is added to the icon and not the container that is actually the one adding extra padding, so I cannot to fix it just in CSS with something like:

.ob-icon-only {
    padding-right: 0;
}

What I’m going to do is finding the parent node of the icons that have ob-icon-only class and fix its style.

$("#stocks_tbl").kendoGrid({
    dataSource:stocksDataSource,
    columns:[
        { field:"symbol", title:"Symbol" },
        { field:"price", title:"Price", attributes:{class:"ob-right"}, format:"{0:c2}" },
        { field:"shares", title:"Shares", attributes:{class:"ob-right"}, format:"{0:n2}" },
        { field:"total", title:"Total", attributes:{class:"ob-right"}, format:"{0:c2}" }
    ],
    toolbar:[
        "create", "cancel", "save", "destroy",
        {
            name:"foobar",
            text:"",
            imageClass:"k-icon ob-icon-only k-i-custom"

        }
    ],
    editable:true,
    navigatable:true,
    pageable:{
        input:true,
        numeric:true
    }
}).data("kendoGrid");
$(".ob-icon-only", "#stocks_tbl").parent().css("padding-right", 2);

Where I set the padding-right to 2.
Finally getting…

Next post show adding custom functions to our KendoUI Grid for managing bound data locally in memory.